The standard edit views for your custom modules are workable, but with a few additions and modifications you can make them a lot more powerful. In my last article “Add grandparent fields to your SugarCRM modules” I showed you how you can relate your modules to grandparent modules and even great-grandparent modules by following the chain of one-to-many relations upwards. This works very well to enhance your list views and detail views.
In this article we are going to use those grandparent fields on the edit view and use them to add filters to the other relate fields on your custom module. I will be building upon the invoicing module I created in the last article. It contains an Invoices module which relates to Accounts, and an InvoiceLines module which relates to Invoices. Suppose you want to edit an invoice line and move that line to another invoice. I will show you how to add functionality to the edit view so that, when you click the “Search” button on the Invoice field, the popup will only show you the invoices for the same account. This makes it much easier to find the right invoice, or any other related module.
Building on the package from the previous package means that I have setup SugarCRM and my package according to my older articles “Keeping SugarCRM under Subversion control” and “Build custom SugarCRM modules in Subversion”. That means that I will be working inside the installable zip package that is generated by the SugarCRM module builder. During this article we will also be making a few small changes to core files of SugarCRM, so make sure you have SugarCRM itself under version control as well, and that it is separate form your package.
You can download the invoicing package that I built in my previous article as a starting point, or you can download the finished invoicing package with the filters already added to the InvoiceLines module. Note that you still need to make the appropriate changes to the EditView.tpl core file as explained in this article.
Add the grandparent fields to the edit view
Let’s start off by adding the grandparent account fields to our invoice line edit view. Adding them is simple, but I want them to be displayed in a certain way which needs a change to a core file. This change is only very small and other changes will need to be made to that same file anyway, so I find it a useful addition. I want the field to be displayed with the parameter “disabled” so that the browser will display it nicely grayed out. Start off by adding the field to the editviewdefs.php file.
- $viewdefs['inv_InvoiceLines'] = array (
- 'EditView' => array (
- ...
- 'panels' => array (
- 'default' => array (
- ...
- array (
- array (
- 'name' => 'account_name',
- 'displayParams' => array (
- 'hideButtons' => true,
- 'readOnly' => true,
- 'disabled' => true,
- ),
- ),
- array (
- 'name' => 'amount',
- ),
- ),
- array (
- array (
- 'name' => 'description',
- 'label' => 'LBL_DESCRIPTION',
- ),
- ),
- ),
- ),
- ),
- );
The “hideButtons” parameter makes sure there are no Select and Clear buttons on the field. The “readOnly” marks the field as read-only for Sugar. The “disabled” parameter is the new parameter we will be adding below. You do that by adding an if statement to include/SugarFields/Fields/Relate/EditView.tpl in the line that renders the text field.
- <input type="text" name="{{sugarvar key='name'}}" ... {{if $displayParams.disabled}}disabled="disabled"{{/if}}>
The field now displays nicely but we need to make sure that it changes when the invoice field is updated. After all, when the invoice line is assigned to a different invoice the grandparent field may change. SugarCRM has taken care of this for us. You can add the “field_to_name_array” display parameter to the invoice name field to do this. Its contents is an array that tells SugarCRM what form fields need to change to what values. Normally Sugar fills in the invoice_id and invoice_name fields. We override it to also fill the account_name and account_id fields. Change the editviewdefs as shown below.
- array (
- 'name' => 'inv_invoices_inv_invoicelines_name',
- 'displayParams' => array (
- 'field_to_name_array' => array (
- 'id' => 'inv_invoicev_invoices_ida',
- 'name' => 'inv_invoices_inv_invoicelines_name',
- 'account_id' => 'account_id',
- 'account_name' => 'account_name',
- ),
- ),
- ),
If you now deploy the module you will see that when you change the invoice name field, the account name field will change accordingly. But, there is a bug. When you press the Clear button on the invoice name, the account name is not cleared with it. This is a bug in SugarCRM but until they fix this upstream we will need to patch this ourselves. Open up the EditView.tpl for the relate field again and take a look at the clear button. It's onclick parameter is specified as follows.
- onclick="this.form.{{sugarvar key='name'}}.value = ''; this.form.{{sugarvar key='id_name'}}.value = '';"
Replace this onclick event with the following code. Thos code cycles through all the fields in the field_to_name_array and clears all the fields correctly. It should all be on one line but I have wrapped it here for visibility. The high number of literal tags are necessary because template will be parsed twice by Smarty.
- onclick='popup_request_data = {{$displayParams.popupData}};
- for (var field in popup_request_data.field_to_name_array) {{literal}}{literal}{{/literal}{{/literal}}
- document.forms[popup_request_data.form_name][popup_request_data.field_to_name_array[field]].value = "";
- {{literal}}{literal}}{/literal}{{/literal}}'
Rebuild and install the package. You should now have fully working grandparent fields on your edit view.
Adding filters to search popups
Now that we have the correct value of the grandparent fields on our edit view, we can use it to fill the initial filter of the search popups. The popups in SugarCRM already support initial filters, but they are not implemented in the edit view. They simply default to an empty string.
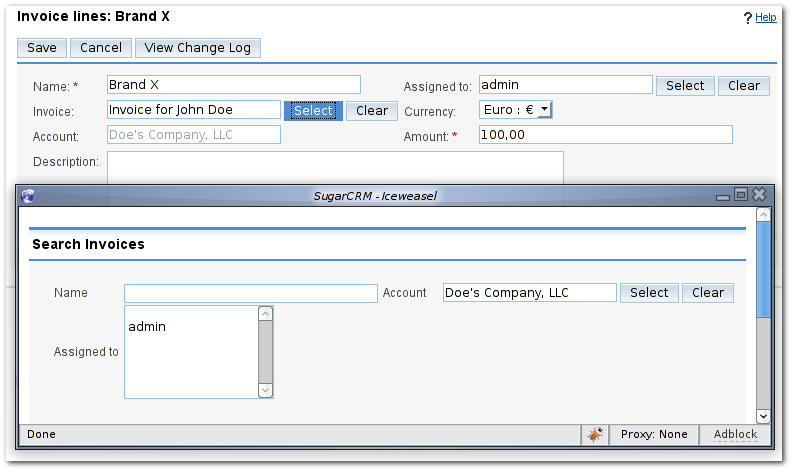
Another little change to the relate field EditView.tpl enables us to specify the initial filter fields from within the editviewdefs.php file. Start off by adding the “initialFilter” display parameter to the edit viewdefs. We want the invoice search popup filtered based on the account. So, when you click the “Search” on invoice field it will by default only show invoiced from the same account as the currently selected invoice.
- 'displayParams' => array (
- 'field_to_name_array' => array (
- 'id' => 'inv_invoicev_invoices_ida',
- 'name' => 'inv_invoices_inv_invoicelines_name',
- 'account_id' => 'account_id',
- 'account_name' => 'account_name',
- ),
- 'initialFilter' => array (
- 'account_name' => 'account_name_advanced',
- ),
- ),
The array keys of the initialFilter define the edit form field whose value will be used. The array value is the search form field it will be mapped to. You can find these values by looking at the source of the search form.
Now edit the relate field EditView.tpl to add support for this initialFilter parameter. Take a look at the onclick event for the “Search” button. It calls the function open_popup() with the fourth parameter set to an empty string. This is the initialFilter parameter. Change the editview so that the fourth parameter becomes as follows:
- ""{{foreach from=$displayParams.initialFilter key=filter_field item=filter_target}} + "&{{$filter_target}}=" + this.form["{{$filter_field}}"].value{{/foreach}}
Note that there is no typo in the above code. It is an empty string immediately followed by a Smarty foreach loop. In case there is no initialFilter specified then the foreach loop will exit immediately and the string remains empty. When I am editing this part of the code I always take advantage and change the previous two parameters as well. Those are the size of the popup. The default 600 by 400 is too small for my liking and so I change that to 900 by 500.
Now build and install the package again. If you now edit an invoice line and click “Search” on the invoice field, the popup will only show search results for the related account, as show below.
Lastly, Don’t forget to commit the changes you made to the relate field EditView.tpl. You can download the finished invoicing package with the filters already added to the InvoiceLines module. Note that you still need to make the appropriate changes to the EditView.tpl core file as explained in this article. Have fun!


Comments
#1 KingoftheRoad
This is very useful tutorial. However, I found the following problems after installing the finished invoicing package and making changes to EditView.tpl.
I make the following invoice line:
Name invoice Account
Line A Invoice 1 Account A
Then edit Line A and change the invoice 1 to invoice 3 (Note Invoice 3 is also of Account A). Then Save. The invoice lines listview becomes:
Name invoice Account
Line A invoice 1 Account A
Line A invoice 3 Account A
That means the invoice Line A was duplicated. If I delete one of them, both gone.
Did I miss anything?
Many thanks.
KingoftheRoad
#2 KingoftheRoad
Would you elaborate more on "The array keys of the initialFilter define the edit form field whose value will be used. The array value is the search form field it will be mapped to. You can find these values by looking at the source of the search form."?
Which "Search Form" are you referring to? I don't understand why the initialFilter value is 'account_name_advanced'.
Many thanks.
KingoftheRoad
#3 Sander Marechal (http://www.jejik.com)
I will have to look into that. I will need to try to duplicate your bug.
I am referring to the search popup. Open up the search popup by clicking the "Select" button. On the top of the popup there is a search form. View the HTML source of the popup to find out the field names of that search form. You will see that the Account field is named "account_name_advanced".
So, an initialFilter array like this:
        'initialFilter' => array (
            'account_name' => 'account_name_advanced',
        ),
Means: Take the value of the "account_name" field on the EditView and put it in the "account_name_advanced" field of the search popup. I hope this clears things up a bit.
#4 KingoftheRoad
KingoftheRoad
#5 KingoftheRoad
Thanks.
KingoftheRoad
#6 Sander Marechal (http://www.jejik.com)
It must be something on your installation then.
#7 Samik Dutta (http://www.ars-solution.com)
#8 Sander Marechal (http://www.jejik.com)
#9 Vishwasrao
Thanks for this solution .It worked great for me.
I have question regarding popup filter .I am ptiing this question on forum .
Thanks once again.
#10 Mayank (http://readoncehavefun.blogspot.com)
I am using SugarCRM, I need to add new modules, these modules will be identicle with the other custom modules installed in the system. Is there any way we can duplicate the module. Just copy paste the module folder and change the keywords when necessary will work?
Please help me out.
#11 Sander Marechal (http://www.jejik.com)
PS: Be smart and make a backup before you try to install your renamed package.
#12 Henrik
I have edited the custom/modules/Cases/metadata/editviewdefs.php to add the include filter:
        4 => array (

          0 => array (

            'name' => 'tpsp_tp_invoice_cases_name',

            'label' => 'LBL_TPSP_TP_INVOICE_CASES_FROM_TPSP_TP_INVOICE_TITLE',

            'displayParams' => array (

              'initialFilter' => array (

                'tpsp_tp_invoice_cases_name' => 'invoice_c_basic',

              ),

            ),

          ),

        ),
But when I edit include/SugarFields/Fields/Relate/EditView.tpl, an "include_filter" is already at the line in question, only it isn't CamelCased:
<input type="button" name="btn_{{sugarvar key='name'}}" tabindex="{{$tabindex}}" title="{$APP.LBL_SELECT_BUTTON_TITLE}" accessKey="{$APP.LBL_SELECT_BUTTON_KEY}" class="button" value="{$APP.LBL_S

ELECT_BUTTON_LABEL}" onclick='open_popup("{{sugarvar key='module'}}", 600, 400, "{{$displayParams.initial_filter}}", true, false, {{$displayParams.popupData}}, "single", true);'>
I've tried using both initial_filter and initialFilter both places, also with your suggested changes. Somehow the select/search is still not filtered.
#13 Henrik
Now, is it possible to add relations directly to TrackingNumber in the Case creation form? Right now I have to create the case first, then dive into the TrackingNumber subpanel to add the TrackingNumbers...
#14 Sander Marechal (http://www.jejik.com)
As for adding TrackingNumbers directly from the creation form, I have no idea how to do that. The problem in your case is that the relation between TrackingNumbers and Cases is a many-to-many relation. SugarCRM doesn't have any widget for that except for the Subpanel.
You could try to create it manually but it would involve a lot of coding (creating a new widget, adding support for saving in the Case bean, etcetera) and it would probably still only work for relatively few TrackingNumbers before it becomes too clumsy.
#15 avinazz
the information above seems to be useful to me if following questions could turn out to be positive?
1) Can i trigger a pop-up window(javascript) with onclick event in illustration above.
2) The file i found matching with this is "/var/www/enjaycrm/cache/modules/Leads/EditView.tpl", can i implement the same logic over here.
3)Do i have to study smarty for this or it will do without?
*********
By the way, for an idea:
I want to show a pop-up window when a save button is clicked.
Any help is appreciated.
thanks.
#16 Sander Marechal (http://www.jejik.com)
#17 Mostafa
Comments have been retired for this article.